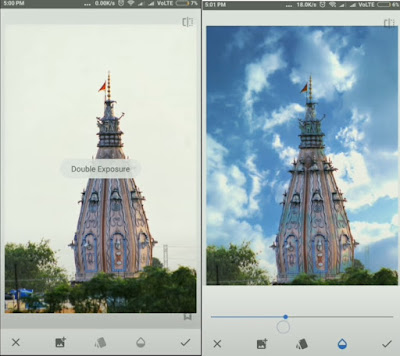
Sky cloud in your photo: Hello folk! First of all welsome to our photo editing solution blog, I think you are surfed something related to photo editing such as how to add sky, clouds in your photo. Don't worry about this because you are in the right place. Here we will tell you the steps of how to add and replace the sky, cloud in your photo using snapseed. some people do this editing using adobe photoshop but nowadays people don't want to put an effort to learn photoshop. Everyone wants easy to understand and do in less time. so people select the snapseed application for photo editing.
Snapseed has many advanved features and provides a quality output so million so users using it for their day by day photo editings. It is downloaded anad used my more than . This google photo editing app has good user ratings and reviews. Okay let's look at the steps to add sky or clouds on any photos.
 |
| How to add sky cloud in a photo using snapseed |
About Snapseed App:
Today so many photo editing applications available in the internet market but snapseed is one of the best famous applications because of so many editing options available in this application and easy to use for all kind of users, its a user friendly some people don't know the full feature of the tool. so you just try to know about all snapseed features before use it on your device. Here we provide you the complete guide of how to add sky/clouds in a photo using snapseed. This app has 4.5 user ratings on the google play store. Snapseed google app is available on both iOS and Android smart phone app stores. Okay, let's look at the method to add clouds in a normal photo using snapseed.
How To Add Clouds In a Photo Using Snapseed :
 |
| Add cloud in a photo using snapseed |
- First, you select the cloud picture from the internet.
- Now open the photo in snapseed then select the double exposure.
- Download the cloud picture in double exposure.
- Then change the blend mode to your photo and apply it.
- Next, you go to review edits and tap the double exposure.
- After that paint the cloud over the sky with the brush.
- Finally, apply a grainy film filter to make the clouds blend in the rest of the image. This is how you can esily add clouds to any plan sky images.
How To Add Sky In a Photo Using Snapseed :
 |
| Add sky in a photo using snapseed |
- Select the photo in which you need to add sky and choose sky picture from the internet or your own sky picture.
- Then open the picture with the dull sky in snapseed to edit.
- Now select the tools and tap the double exposure then it will lead to your phone gallery and select the sky picture.
- The Sky picture appears on the first picture, bottom of the image some options appear like ( Default, Lighten, Darken, Add,)
- Choose any of these that best suit your photo.
- Your focus only on your sky picture, don't concentrate on the background photo. Then adjust the opacity top layer picture.
- Now remove your top layer from the foreground.
- Select the double exposure and tap the brush icon. using this brush just paint the top layer on the first photo.
- only slide the brush on the sky region. Zoom the photo and make sure don't leave any empty area.
- Finally, Adjust and warmth of the background so it matches the sky
- Now the sky added a photo is ready. This is how you can easily add any sky image in the background.
No comments:
Post a Comment